All About Brakes...
A short while ago I mentioned that I had started several long-winded posts all at once. This is the first of those, whew! One down, two to go. Though this post may look long, and though it took considerable time to compile, it is in no way comprehensive, but it will provide you with a slightly more than general knowledge of the different bicycle braking systems (some common ones, some rare) around today.

(photo 1) a large disc brake rotor on a bicycle built for five


(photo 1) a large disc brake rotor on a bicycle built for five
Contrary to the promises
inventors of any number of perpetual motion machines might feed you, a general
rule holds that everything set in motion will eventually come to a stop. That
includes my bicycle, as well as yours. Though you may occasionally witness a
rider on a fixed-gear bike using his, or her, foot against either a tire or the
ground, this method of arriving at a rubber melting, skin wilting halt went out of popular style
during the age of Fred and Wilma Flintstone. Similarly, and believe it or not,
the preferred method of stopping does not involve any form of crashing
whatsoever, though doing so will bring forward momentum to a halt. Instead,
bicycles from the earliest days of their invention have relied upon some form
of mechanical assistance to bring their riders to a safe stop. Further, while
many different forms of brakes have come and gone, or are still in use, there
is one thing they have all (to the best of my knowledge) have had in common -
they have, and still do operate under the principles of resistance and
friction.
So lets start with the basics - why brakes work - the
resistance and friction I mentioned above. Friction occurs as a result of two
objects moving against one another; it causes matches to flame, fingers to
snap, heels to wear, and bikes to stop. The funny thing is as long as we are
moving, we strive to be hampered by the effects of friction as little as
possible; it is the reason we frequently (hint, hint) and regularly lubricate
our chains, bearings and pulleys. It is why, even the least bit of brake rub is
anathema. But, when it becomes necessary to slow and stop we all hope that
resistance will be there to do its thing.
Now, as much as it pains me to say it at this point, if you
are a cycling veteran, you may want to skip the rest of this post - as it is
geared more toward the novice or beginner, riders who may be unfamiliar with
the various braking forms they are likely to encounter. At the same time there
will also be some historical stuff even an intermediate rider may be unfamiliar
with.
If you have walked into a bike shop looking for a new bike,
taken a look at the bikes locked to racks and posts as you walk along the
street, or studied the ads in your favorite magazine, you have no doubt noticed
numerous types of brakes. Some of these may have appeared to be vaguely
similar, others completely different. Perhaps you accepted that without a
second thought, but maybe you wondered why there are differences, or what those
differences mean.
You can start by dividing the types
into three broad categories: First are brakes which function by the application
of pressure to the wheel's rim (braking surface), second are those which apply
pressure to a disc attached to the wheels. The knowledgeable Sheldon Brown, in
his writings, grouped these two together, reasoning that a wheels rim acts as a
large disc, and while I can’t argue that point I am splitting them into two
groups. A third method uses the power of the riders legs, along with a mechanism located in the rear hub - pedal to move
forward as expected, but jam the pedals and crank arms backward to stop (and
leave a great skid mark on the pavement).
Before we get on to the different
brake varieties you may encounter, lets get some basic terms out of the way
first. The most common brakes seen today are composed of three primary components to which I like to apply labels based upon their function - initiation, transference, activation. Levers, which are located on the bike’s handlebars and generally follow one
of two designs depending upon the type of bar to which they are mounted, are initiation, they begin the process of braking (photos 2 & 3). The
second component is the actual braking mechanism - the activation, the function that, due to friction between parts causes the bike to slow and stop. These vary by type but are
commonly known as either calipers or cantilevers. Interestingly, the term
caliper also applies to disc brake mechanics, though disc brake calipers are
visually distinct from other types of brake caliper. Attached to the calipers are pads, or blocks, and are generally made of rubber, though other materials are sometimes used (photo 4). Some blocks/pads (mostly older types) are set into a metal cradle called a shoe, though most pads these days have done away with the enclosing shoe portion. Of course it is the resistance between pad and braking surface which causes the bike to slow and stop.The third function label refers to the transference of energy between the first two; braking energy is transferred from lever to caliper/cantilever
via either cable or fluid, both of which are partially, or entirely, enclosed by housing (photo 4). A quality housing is composed of three parts - a thin plastic inner sleeve through which the braking cable is routed, this is wrapped by a woven metal sleeving, itself enclosed by a colorful outer sleeve. The


(photo 2) fairly typical flat or riser bar brake lever

(photo 3) typical road "drop bar" brake lever

(photo 4) various pads (shoes), cable, and housing
For the past number of decades, the
type of bicycle we typically identify as road bikes (what we, as kids, used to
call ten-speeds in the 1970s, and maybe still do) have been dominated by hand-lever
activated rim brakes; lately, there has been a slight shift in the market, and
disc brakes have begun to make inroads into this very tradition oriented
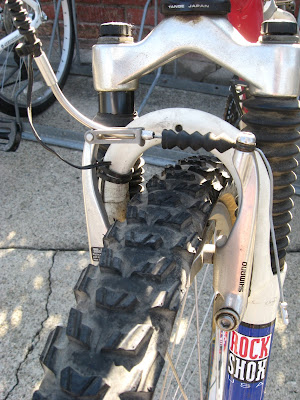
market. The earliest of the rim brakes were of the center-pull, or cantilever variety.
Center-pull brakes are operated by a standard (for either drop or flat bars)
hand lever; the lever pulls a cable attached to a second, or transverse cable which
attaches to each of the two separate caliper arms leveraging them, and the
brake pads, tight against the wheel rim (photos 6 & 7, and photo 10 for transverse cable). The caliper arms are mounted to posts
(bosses) welded to the fork (photo 5), in the
case of the front brake, or the seat stays for the rear brake. Less frequently
(rarely) the bosses have also been welded to the lower chain stays with the
calipers thus being located “underneath” the bike, parallel to the ground (photo 8). Cantilever style brakes are mostly seen on
older models and lower end road and mountain bikes. On the other hand they are
currently the most common form of brake on cyclocross bikes as they tend to be
less affected by mud build-up, a problem with other forms of rim brakes, and are lighter than disc brakes.

(photo 5) fork bosses for cantilever brake arms

(photo 6) cantilever brake

(photo 7) a front cantilever brake of a Paul Charrel bike

(photo 8) 'u' brake with mounting on the underside of the frame
Similar to centerpull / cantilever
brakes are what are known as ‘u’ brakes. These are activated via main and
transverse cables, and have caliper arms mounted to fork and frame via bosses
just as cantilever brakes. There are differences though. First, while the
bosses for cantilever brake arms are located below the level of the wheel rim, the
bosses for ‘u’ brakes are located above the wheel rim. A second difference is in
the shape of the caliper arms; while cantilever brake arms angle outward and
away from the wheel, ‘u’ brake arms curve, and overlap above the wheel (photos 9 & 10).

(photo 9) typical 'u' brake with a linear pull operation

(photo 10) standard center pull 'u' brake
Another similar form of brake is
known as the roller cam brake. Again these models utilize two separate caliper
arms mounted to bosses; a cable from the brake lever pulls a triangular-shaped
cam between two rollers attached one to each caliper (photo 11). Like ‘u’ brakes, roller cams mount to bosses that are located
above the wheel rim. This difference is due to the design of the cantilever
arms and the way that they operate. Compare the photos; you’ll see what I mean.
Roller cam brakes are relatively rare and you are unlikely to come across them on
any contemporary shop-bought bike these days; they tend to be custom installations.

(photo 11) roller cam brake
Yet another form of brakes to
utilize cantilever arms are known as linear pull brakes; they are also commonly
referred to by the Shimano trademarked name ‘v’ brakes (photo 12). This form of brake seems to be most common on low to
mid-level mountain bikes. The brakes are distinguished by the familiar
“noodle”, which redirects the force of the cable pull laterally between the two
cantilever arms. Like centerpull cantilevers, the bosses for mounting linear
brake arms are located below the level of the wheel rim. My first mountain bike came with these brakes, and I never did quite get the hang of adjusting them.

(photo 12) linear pull 'v' brake
Most mid and high level road bikes
produced today come equipped with side-pull brakes, either single pivot (photo 13), or
dual pivot (photo 14). This has probably been the case since at least the 1980s. These
brakes are the easiest to install and adjust, and generally provide reliable
stopping power. Both types mount to the bike via a single bolt; at the front
brake, the bolt secures through the center of the fork crown, while the rear
brake is centered above the wheel via a bridge between the two seat stays. The
brake cable attaches to the caliper arms at the side, rather than centered. The
arms of single-pivot brakes pivot off the center bolt attaching the brake to
frame or fork, forcing brake pads on each arm against the rim. Dual pivot
brakes have two pivot points – one at the center, the other at the side
opposite the cable attachment. They operate the same way as single pivot
brakes, but the second pivot point provides for increased stopping power. Both
types are frequently seen on road bikes today, though dual pivot brakes tend to
be on higher end models.

(photo 13) single-pivot side-pull brake

(photo 14) dual-pivot side-pull brake
Through a portion of the 1980s and
1990s, Campagnolo produced what is called the delta brake (photo 15). These brakes have a
distinct aero appearance, and from their outward look seem to resemble a
modified centerpull brake with the mechanical bits enclosed. Linkages, rather
than a transverse cable, within the brakes aero housing are activated via a
center pulled cable, forcing the caliper arms against the rim. These brakes are
heavier than other center or side pull brakes, and at the height of their
popularity I can remember people talking about their lack of stopping power.
Even though Campagnolo (as well as a few other companies) popularized this
style brake in the 1980s and 90s, the basic design dates to the 1930s.

(photo 15) delta brake
An additional type of rim brake, one
you are likely to only see on vintage bikes is the rod brake (photo 16). Whereas center and side pull brakes press
inward against the braking surface of the wheel rim sidewall, rod brakes,
activated via a hand rod, pull the pads upward against the rim on either side
of the spokes. Typically, and contrary to most of the wheels produced today,
these rims do not have sidewalls (you will notice the difference in the photo. Though
virtually confined to the vintage market, at least one company, Flying Pigeon
still uses these brakes on one of their currently produced models.

(photo 16) rod brake
For a short period of time in the
1990s some higher end mountain bikes could be found with hydraulic rim brakes
(see photo). While they did provide increased stopping power, their increased
weight and mechanical complexity combined to hasten their fade from the U.S.
market (they apparently still enjoy some popularity in Europe, however).
Any discussion of rim brakes would be lacking if it did not give some consideration to the rims themselves. While generally not regarded as part of the brake proper, they are most certainly a part of the braking mechanism. Rims, like the brakes they act in tandem with, have evolved over time to become more efficient. In the not too distant past rim sidewalls tended to be designed with angled sidewalls, even curved. This was never an optimal design given that brake pads have long been flat and vertically parallel to one another. Wheels, today, are designed with vertically parallel braking surfaces so that brake pads engage fully and provide more efficient braking. On occasion you may notice certain rims, generally older ones, which are dimpled along the braking surface; this was believed to improve braking efficiency.
Any discussion of rim brakes would be lacking if it did not give some consideration to the rims themselves. While generally not regarded as part of the brake proper, they are most certainly a part of the braking mechanism. Rims, like the brakes they act in tandem with, have evolved over time to become more efficient. In the not too distant past rim sidewalls tended to be designed with angled sidewalls, even curved. This was never an optimal design given that brake pads have long been flat and vertically parallel to one another. Wheels, today, are designed with vertically parallel braking surfaces so that brake pads engage fully and provide more efficient braking. On occasion you may notice certain rims, generally older ones, which are dimpled along the braking surface; this was believed to improve braking efficiency.
So that pretty much illumines the
spectrum of rim brakes. Now we can move on to disc brakes. At first glance, you
might not think it but, disc brakes do share characteristics common to other
brake systems. Of course they use resistance and friction to slow the bike.
This is accomplished by the application of pressure, or force, to push calipers
and brake pads against a braking surface – the disc, also known as a rotor. Like many of the other
brake options, the calipers of disc brakes mount to bosses at the fork (front brake), or
stays at the rear brake. There are two types of disc brake activation – the
calipers are actuated either by means of cable (photo 17), or hydraulic fluid (photos 18 & 19). Commonly
the two are known as mechanical disc brakes, and hydraulic disc brakes.
Cable-actuated, or mechanical, disc
brakes are very similar to cable-actuated rim brakes – hand levers pull a cable
taut, forcing calipers with attached brake pads tight against a metal disc. The parts may look different, but the mechanics are the same.
Hydraulic brakes, on the other hand, use a fluid in place of cable, to push the
calipers and brake pads against the rotor. Basically, brake fluid is contained
with specific areas (reservoirs and housing) as the hand lever is pulled if
forces the brake fluid to expand into
unfilled spaces behind the calipers; the pressure pushes the calipers against
the rotor. When the levers are released, the fluid moves back into the holding
reservoirs, the pressure is released, and the calipers retract.


(photo 17) mechanical disc brake caliper mechanism

(photo 18) hydraulic brake lever showing fluid reservoir

(photo 19) hydraulic disc brake caliper mechanism and attachments
For years disc brakes were most
commonly to be seen on mountain bikes where their increased stopping efficiency
offered a distinct advantage. Lately we have begun to see them more often on
other forms of bike, most notably on cyclocross bikes, but also (and still
infrequently) on road bikes. The additional weight has largely kept them out of
the road market, which has long been weight-conscious. Certain areas of the
road market, those where excess weight is of less concern, such as commuters,
have been more open to the use of disc brakes. If you pay close attention at your local bike shop you will notice that discs, or rotors, come in different diameter sizes. Heat, being bad to efficient braking, it stands to reason that the most effective braking system is also likely to be the one that is most effective in dissipating heat. Larger rotors, such as the massive one on a bicycle built for five shown in the first photo at the top of this post, will allow heat to dissipate quicker than smaller rotors. Of course we rarely have the option of installing something that large on our stock bikes, neither are they, in real riding situations, even necessary. Stock rotors provide perfectly acceptable stopping power.
Coaster brake, backpedal brake, foot
brake (photo 20) are all interchangeable terms for the same thing. All those Schwinn’s and
Huffy’s my generation grew up learning to ride, along with countless makes and
models before and since, have used this not
as simple as it sounds method of slowing and stopping. Just because the braking mechanism is only marginally visible, does not mean mechanical assistance is not taking place. The braking
mechanism is integrated internally into the rear hub, which can be either single-speed or
internally geared. When backward pressure is applied to the pedals/cranks it
forces pads located within the hub against the inner surface of the hub shell.
The resistance brings the bike to a gradual, or sudden stop, depending on how
much force is applied. A sudden, sharp backward push can bring the rear wheel
to a quick halt and create those great, long skid marks we used to strive for.


(photo 20) visible portion of a coaster brake
Even though bikes equipped with
coaster brakes don’t have the familiar brake hand levers, they are not to be
confused with brake-less, fixed-gear bikes. Coaster brakes do contain a
freewheel mechanism allowing the rider to stop pedaling and coast when wanted.
One additional unique type of brake is known as a drag brake (photo 21) and, I believe, you will only find them on tandems. Due to their added weight, tandems can quickly gain speed and momentum, especially on downhills, and require longer distances to stop. As a result, many come equipped with the extra drag brake; these are not intended to stop the bike, but rather to slow it enough for standard rim brakes to work effectively. If not for the added slowing, rim brakes by themselves, on a tandem, would be more likely to cause overheating of the rim leading to potential failure (see advantages and disadvantages below). At the least, tandems equipped only with standard rim brakes would take longer to stop than tandems with a drag brake.

One additional unique type of brake is known as a drag brake (photo 21) and, I believe, you will only find them on tandems. Due to their added weight, tandems can quickly gain speed and momentum, especially on downhills, and require longer distances to stop. As a result, many come equipped with the extra drag brake; these are not intended to stop the bike, but rather to slow it enough for standard rim brakes to work effectively. If not for the added slowing, rim brakes by themselves, on a tandem, would be more likely to cause overheating of the rim leading to potential failure (see advantages and disadvantages below). At the least, tandems equipped only with standard rim brakes would take longer to stop than tandems with a drag brake.

(photo 21) drag brake on a tandem
There are another group of brakes,
curiosities mostly, which you are unlikely to see on any but the most rare of
bikes, and operate by creating resistance against the tire. These are commonly
known by the names spoon brakes, and duck brakes. Spoon brakes operate via a
rod-activated paddle faced with leather or rubber, which is pressed down
against the top of the tire (photos 22-24). Duck
brakes used wooden or rubber rollers, which would be forced against either side
of the tire to create resistance and stop the bike (photo 25).

(photo 22) spoon brake

(photo 23) spoon brake

(photo 24) spoon brake

(photo 25) duck brake
Advantages and
disadvantages
When considering the advantages and
disadvantages of these different braking systems, we generally look at specific
factors – weight, efficiency, typical riding conditions, and ease of use and
maintenance. Unless you build your bike from the tubing and welds on up, you
rarely have the option to choose which type of brake your bike will use;
manufacturers install one or another, and the mounting requirements
predetermine which is installed. For instance a road bike that does not possess
bosses for disc brake calipers, will only come with one of the other types.
That does not mean you shouldn’t give some thought to the pluses and minuses of
each.
Lets consider each of the four
factors, mentioned above, in turn beginning with weight. Since they contain the
fewest parts we would expect coaster brakes to be the lightest of the types,
but when you consider that the bikes these tend to be installed on are amongst
the heaviest, any weight saving is cancelled out. Thus between rim and disc
brakes, the rim brakes win out in the weight category. Rim brake calipers
(center and side pull brakes) mount to the frame, and do not require special
bosses for mounting as do disc or centerpull/cantilever brakes. Disc brakes
also required an extra component, the rotor (and mounting hardware), whereas
rim brakes simply use the wheels' rim for stopping.
Disc brakes have long been
considered to provide the most efficient stopping power, and amongst them, hydraulics have an
edge over mechanical disc brakes. Unless you have ridden each type you might not think it, but the edge is noticeable. That said, I have never encountered an instance when my mechanical discs were anything other than entirely acceptable. There are times and places where that extra
power is welcome, maybe even necessary – narrow trails with steep downhills for
instance, but I suspect that most riders do not need hydraulics. If we take this further and consider riding on the road, I would question the need at all for disc brakes. Yes, they would offer the same advantage in stopping efficiency, but really, side-pull rim brakes have always provided more than adequate stopping power on any ride I have ever taken.
When I speak or riding conditions I am mostly referring to weather and water/snow/mud. Of the various brake types coaster brakes, due to the braking mechanism being fully enclosed within the hub, are least affected by inclement conditions. Disc brakes are generally less adversely affected by water than are rim brakes; any diminution of braking power, if noticed at all, is negligible. In wet situations, rim brakes will skim for a moment before they catch, so there is some decrease in their effectiveness, but not so much that is should be of concern. Rim brakes can also be affected by mud and snow. As the calipers fit fairly snug against the wheel/tire, the gap can become clogged by thick mud or snow; this is the main reason cyclocross bikes normally come equipped with cantilever brakes rather than side pull brakes - they offer more clearance and so are less likely to clog. Of course during regular road riding situations this is unlikely to be a problem and the common side pull brakes are just fine.
The fourth factor, and the one that likely impacts us the most, has to do with ease of use, and maintenance. Again, coaster brakes are probably the easiest to use and require little maintenance; what maintenance they do need will likely be resolved by your local bike shop. Due to their internal mechanism, most cyclists will be unwilling to undertake maintenance themselves as it would require disassembly of the rear hub. No blood, sweat, or tears, but a little money on occasion. Of the various rim brake types, the side pull models, both dual and single pivot, are the easiest to set up, adjust, and maintain. For a beginner, or novice, there might be a slight learning curve, but once the procedure is understood it is a simple matter to work on them yourselves. With an extra cable connection, center pull and cantilever brakes require a little more effort to set up, adjust and maintain, but are unlikely to be beyond the ability of most anyone. All rim brakes will require periodic cable and brake pad replacement. Pads should also be checked occasionally for hard bits of grit which may lodge in the softer rubber, causing wear to the wheel rim. Checking the rim, by the way, is something that should be done regularly - thousands of miles of braking will, believe it or not, cause the rim wall to thin, leaving it susceptible to the danger of catastrophic failure. I have never had a wheel wear so much that it had to be tossed, but the experts say it can happen.
Mechanical disc brakes have reached a point where, once their principle of operation is understood, the are as simple to set up, adjust and maintain as rim brakes. They also will require periodic pad and cable replacement. Because they use a fluid to transfer energy, hydraulic disc brakes are the most complex. Basic adjustment due to pad wear is no great problem, but set up and maintenance can be. Maintenance is within reach of anyone mechanically inclined, though I do recommend having step-by-step directions at hand, and banishing any thought of deviating or skipping a step because it seems unnecessary. The first time I attempted to bleed my system did indeed involve blood, sweat, tears, as well as cursing and starting over. Disc brakes, both mechs and hydros, have one additional potential problem - glazing. Frequent and hard braking can cause a glaze for form on both the brake pads as well as the rotor. This will cause a decrease in braking effectiveness, and create a sharp squealing sound when the brakes are applied. A little fine-grit sandpaper should solve the problem. One additional problem, unique to disc brakes, can cause some grief if not understood - never pull the brake lever when the wheel is not attached. Doing so will cause the calipers to not completely retract and rub against the rotor. This is not a major problem, as the fix is easy enough, but might be confounding if you don't understand what happened.
Finally, I in no way want to belittle
Sir Isaac Newton, nor his theory on the effect of gravity. If we were to
roll along, no pedaling allowed, just coasting, gravity working in tandem with
resistance would cause us to slow and eventually topple over at a complete stop.
Mostly though, we don’t have the luxury of distance, or time, for this to be a
realistic option, and instead we rely on one of the mechanically assisted
methods outlined above.
Nice blog all-about-brakes for Cantilever arms
ReplyDelete